It’s become one of the most ubiquitous handguns in the country. Thanks to its proliferation into duty use for police and the armed forces personnel, the SIG P320 has made quite a name for itself. It’s earned part of that reputation for being extremely modular and easy to clean. In this post, we’re going to look at how to clean a SIG P320 series pistol.
How to Clean a Sig P320: A Step by Step Guide
First things first: this guide actually covers several different pistols. Of course, it applies to all SIG P320s: full-size, carry, X-Five Legion, you name it, this is how you clean it. This guide also applies to the M17 and M18 pistols that have become standard issue in the military. These are essentially the same gun as the P320 with a thumb safety.
To get started, you’re going to do the same thing you do every time you pick up any gun: make sure it’s not loaded. To do that, pop a magazine out, rack the slide twice, and visually confirm that the chamber is empty. Once you do, you’re ready to start taking this thing apart.
Step 1: Remove Slide
First, pull the slide back and lock it in place with the slide release lever. If you have an empty magazine in the gun, it should stay open on its own. Then, flip the takedown lever 90” so it’s facing the same way as the pistol grip.
Then, WITH ONE HAND HOLDING ONTO THE SLIDE, push down on the slide release. This will allow the slide to move forward. It’s going to be under tension from the recoil spring, so make sure you slowly guide it off with your hand. Otherwise, it’ll shoot across the room/into your face.
Move the slide forward to remove it from the grip and move on to step 2.
Step 2: Break Down Slide Assembly
If you’re familiar with Glocks, this step will come naturally to you. Breaking down a SIG P320 slide and a Glock slide is exactly the same. First, you remove the recoil spring. This will allow you to take the barrel out of the slide.
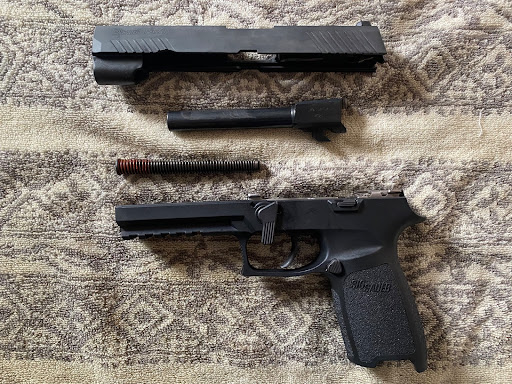
This is what you should be looking at after Step 2.
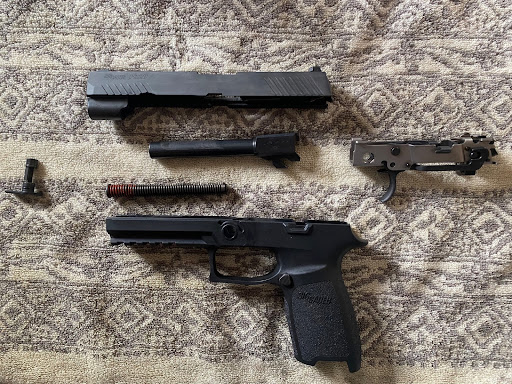
Step 3: Remove Fire Control Unit from Grip Module
Up until now, disassembling your SIG P320 has been pretty similar to other “Wonder Nines.” This is where that changes. First, you’re going to need to remove the takedown lever from the grip module. To do that, pull it outwards while facing down. You may need to jiggle it a little bit to get it to start moving.
Now, remove the Fire Control Unit (FCU) from the grip module. To do so, firmly grasp it in your hands. FIRMLY GRASP IT! Pull from the front of the FC to remove it. This may be difficult the first time you clean your gun, but it’ll get easier the more you do it.
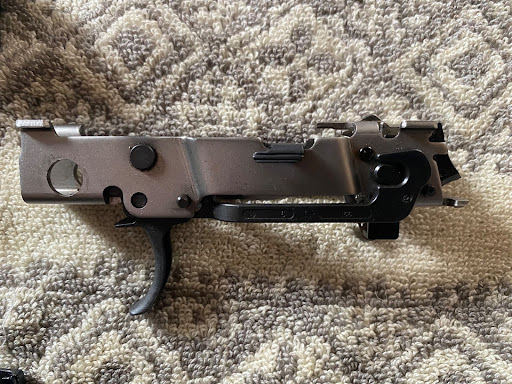
SIG P320 FCU in all its glory. This is where the magic happens.
Step 4: Ballistol Bath
At this point, you have your P320 field stripped. Now it’s time for the cleaning to begin. I like using Ballistol to clean my guns. It’s eco-friendly!
If you use a CLP, spray it over the outside of the barrel, in the bore, over the front half of the slide, and over the ridges where the slide connects to the FCU. You’ll also want to wet a cleaning patch and apply some CLP to the slide face (where the firing pin comes out). Additionally, use a patch to apply some CLP to the FCU. If you don’t use CLP, you can use a bore cleaner for this task.
Let the cleaner sit for a few minutes to penetrate through fouling and break it apart. Then, move on to Step 5.
Step 5: Scrub and Lubricate
Now it’s time for some elbow grease. You’ll want to scrub the grooves that connect the slide to the FCU, as well as the slide face, with nylon or bronze brushes (depending on the amount of fouling). Use a patch to wipe away any carbon crap that breaks loose.
One of the most important places to scrub is through the barrel. Use a bore brush to scrub from the back of the barrel towards the front. Scrub a few times, then run a patch through to collect any fouling. Do this until your patch comes out clean.
While you don’t necessarily want to scrub the FCU, you do want to clean it. You can do that by wiping it down with patches or a rag. It shouldn’t be too dirty in the first place.
After you’re done scrubbing, wipe away any leftover CLP/cleaner. If you use a CLP, you won’t have to worry about lubricating your gun. If you don’t, apply some oil to the slide grooves, along with the front end of the top of the barrel.
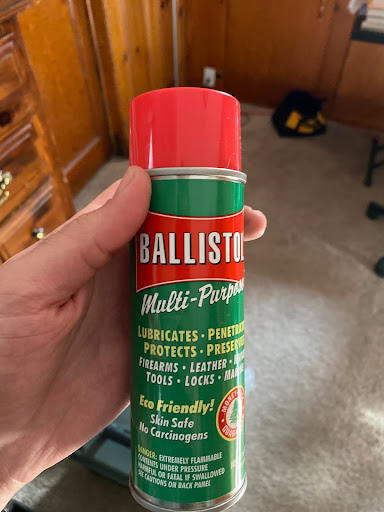
Ballistol rules.
Step 6: Reassemble
Now that you’re done cleaning, it’s time to put the pieces back together. Start by inserting the FCG back into the grip module. Get the trigger in first, then rock it backwards. You want it to be pushing all the way up against the back of the grip module.
Next, re-insert the takedown lever. You’ll need to push it through the first hole with the lever pointing downwards. It may take a fair bit of jiggling, but you’ll be able to push it back through the length of the grip module to hold the FCU in place.
Once you finish getting the FCU, grip module, and takedown lever put back together, it’s time to reassemble the slide assembly. First, insert the barrel into the slide. Then, take the recoil spring and push the skinny end into the front of the slide. Then, compress it and rest the big end against the barrel. It’ll hold the barrel in place.
Finally, reconnect the slide assembly to the bottom half of the gun. Push the slide all the way back and lift the slide release lever to hold it in place. Then, push the takedown lever back into its original position (pointing towards the back of the gun). Then, drop the slide release.
Rack the gun a few times and pull the trigger to make sure everything works. If it does, you’re good for another thousand rounds!
If you’re more of a Glock person, don’t fret. We have a cleaning guide for you too! Click here to read more!
RELATED STORIES