There are few handguns as polarizing as the 1911. While plenty of die-hard fans exist, there are also countless naysayers who mercilessly mock the handgun with inside jokes like “TwO wORld wArS!!!” But we’re not here to settle any debates about the 1911 today. Instead, we’re going to take a look at cleaning a 1911 with this guide.
How to Clean a 1911: Before You Start
Before you start cleaning your 1911, you should ensure that it’s not loaded. You should always do this every time you pick up a gun without the intention of shooting it. To make sure your 1911 is clear, simply eject the magazine and rack the slide twice.
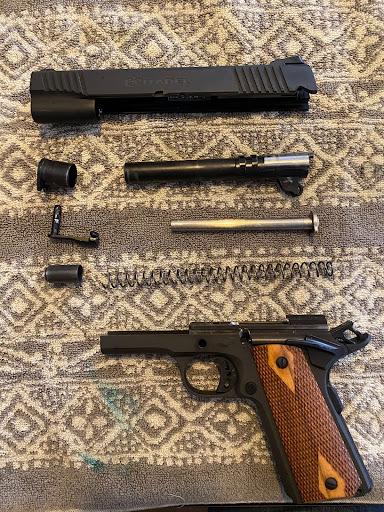
A field-stripped 1911
1911 Cleaning Guide
If you’re familiar with modern polymer striker-fired pistols like the SIG P320, M&P 9, or literally any Glock, you’re going to be in for a surprise when you clean your 1911 for the first time. These striker-fired guns are significantly easier to clean, thanks to having almost 100 years more development time than the 1911. But the 1911’s reliable, single-action design has kept it a popular handgun for more than a century.
Step 1: Remove Recoil Spring Plug and Barrel Bushing
First things first, you’re going to need to remove your recoil spring’s tension inside of your gun. To do that, push down on the recoil spring plug (the cylindrical piece below the barrel bushing). Make sure you’re pointing the plug away from your face when you do this, as your spring will want to decompress and shoot forward. You don’t want to put an eye out.
While holding the recoil spring plug down, turn the barrel bushing counterclockwise. Then, slowly release the tension on the recoil spring plug. Once you’ve released the spring’s tension, turn the barrel bushing clockwise until it stops. At this point, you’ll be able to remove the bushing itself.
Step 2: Remove Slide
Next, push your slide back until the small notch (slightly further back than the slide lock notch) is over your slide release lever. At this point, you can push the slide release lever out from the opposite side of the slide. Once it’s out, push your slide forward to remove it completely from your frame.
Step 3: Disassemble Barrel, Recoil Spring, Guide Rod
Gently remove the recoil spring from the guide rod by pulling it forward. Once it’s off, you can remove the guide rod. This will expose the barrel, allowing you to pull it forward and out of the slide. Congrats! You’ve successfully disassembled your 1911.
Step 4: Ballistol Bath
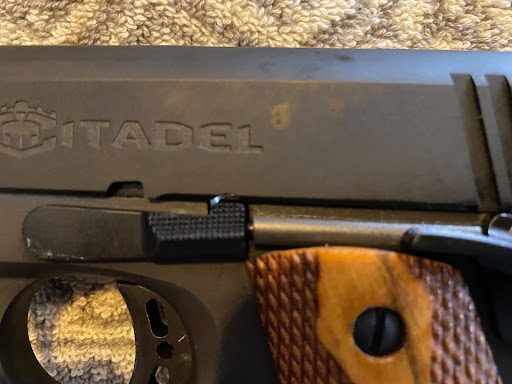
Now that you need to get to cleaning. I have a cheap 1911 made in Turkey by Citadel, so I just spray everything down with Ballistol to begin breaking down any fouling. If you have a nice 1911 from a high-end builder, the manufacturer may recommend that you use some specific kind of solvent, lubricant, or CLP. In that case, definitely go with their recommendation.
Regardless of what cleaning solutions you decide to use, make sure you keep them away from the back end of the slide. You want to keep your firing pin bone dry. Outside of that, I soak the heck out of every square inch of my 1911. Make sure you get plenty of bore cleaner down your barrel, too.
Step 5: Scrub
Next, you’re going to need to apply a little bit of elbow grease. Use a nylon brush to scrub anywhere that you see fouling buildup. Pay special attention to the grooves on your slide and frame that hold your gun together. 1911s have a lot of nooks and crannies, so this can take some time.
This is also when you’re going to want to clean your barrel. Give your barrel a few good scrubs with your bore brush. Then, run some cleaning patches through it to collect any fouling that’s broken free. Keep doing this until your barrel is clean to your standards.
Finally, you’re going to want to pay some extra close attention to your feed ramp. This part of your frame guides cartridges from your magazine into battery. If you notice your 1911 is jamming, 99 percent of the time a dirty feed ramp is the culprit.
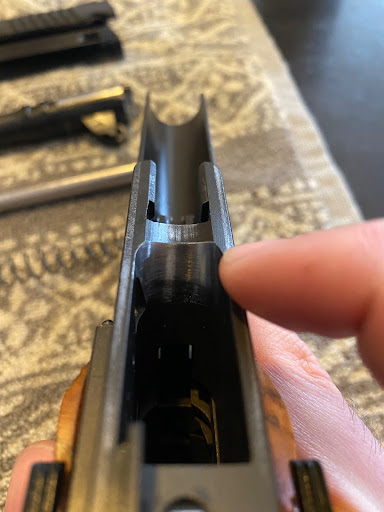
Make sure this area is clean to prevent jams.
Before I start putting my 1911 back together, I’ll usually wipe down everything else with a rag to make sure there’s no leftover fouling.
If you didn’t use a CLP, you also will need to lubricate your 1911. I’ve found that my 1911 likes a little bit of extra lubrication around the outside of the front of the barrel. You may also want to use a bit on the slide grooves to keep everything moving smoothly.
Step 6: Reassemble
Now it’s time to put everything back together! First, put the barrel back into place in the slide. Then, replace the guide rod and recoil spring. After that, reattach the slide to the frame by sliding it front to back.
The next part is a little tricky. You’re going to need to push the slide release lever back into place. However, this will only work if you have the small hoop that dangles off the barrel in the right place. You’ll want it to look like this:
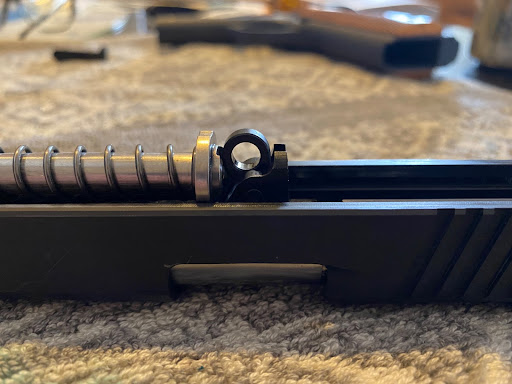
Then, hold the slide upside down (with the hoop pointing upwards) and push the slide back. Watch through the slide release hole until you see the hoop align with it. Then, push your slide release into place. It won’t go all the way, but keep pushing it back until the slide release lever finally goes all the way through and into place. Phew, glad that’s over.
The rest of the reassembly process is pretty easy. First, insert the barrel bushing. It has set grooves that allow it to slide in and out of your gun, so you’ll have to position it at around 4:30 to push it in. Then, rotate it to 9:00. You’ll need to maneuver it through the recoil spring for this to happen, but that’s not too difficult. Finally, replace the recoil spring plug on the end of the recoil spring and push it into the slide. Rotate your barrel bushing back into place, and release the pressure on the recoil spring plug.
You did it! Good job. Rack the action and pull the trigger a few times to make sure everything works. Then, you’re ready to sling more lead downrange.
Do you fancy yourself to be more of a Glock geek? Don’t miss our Glock cleaning guide here!
RELATED STORIES